|
First Day of ServiceOkay. Here we go. Your first account. Your first day of service. If you’ve worked as an office cleaner before, you’re probably familiar with the routine. You may have worked alone or as a crew of three. We are going to approach this though as if you don’t have any experience and that you are only a crew of one – yourself.
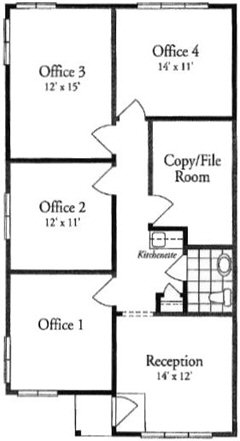
Let’s say that you signed-up the smaller account that we toured in our chapter by the same name – The Tour. Let’s also say that your first day of service for this account occurs on a weekend giving you a whopping 60 hour window to get this job done. We are also going to assume that your vehicle has only a trunk and not the space that a van or wagon has. Because of that, we are going to break this assignment up into two parts: one, to perform the routine services including the extra cleaning the office will need to get back into shape, and two, to scrub the floor and clean the carpet with a rental machine. For the first part of our assignment, we will need the following supplies and equipment: Vacuum (preferably with a wand) Dusting equipment Rags / Towels Furniture cleaner / polish Toilet swab Bowl cleaner or Calcium / Lime remover Glass Cleaner Liners / Collection Can
1) Empty and reline all wastebaskets. 2) Dust and/or clean all furnishing, window ledges, etc. 3) Clean assigned kitchen or kitchenette areas. 4) Clean & sanitize all washroom fixtures. 5) Sweep and mop wash all tiled areas. 6) Vacuum all carpeting and runners. 7) Clean door and reception glass.
High-dusting. Using either a dust mop with a 12 inch dust head or a duster on a telescopic pole, we will be removing the cobwebs along walls, corners and ceilings and dust and debris from the vents. If the vent is facing a nearby wall, there could be a patch of dust on the wall that needs to be cleared away. Some of this dust and debris will undoubtedly fall to the carpeting and furnishing, even on the exposed wastebaskets. Since I don’t want my new can liners messed-up by this falling debris, I usually wait until all the high-dusting is complete before installing new liners. Some accounts have tall furniture like filling units, bookcases or storage units. Oftentimes there is a step-stool in the office so that the employees can access their own items. You will need it to access the tops in order to dust them. If the office doesn’t have a step stool, you’ll have to bring one. While high-dusting, you might as well sweep away any cobwebs and bugs that accumulate in the window boxes. Low-dusting. Cobwebs build-up just as readily around ground level corners, along baseboards and under furniture. It is advisable to finish this job before moving on to furniture cleaning. Chair bottoms and bases will be exceptionally dusty, too. Garbage Cans. Aside from emptying the garbage from each can into your collection barrel or liner, before installing a fresh liner, you are advised to wipe the can of spills and other soil. If you’re using clear liners, you may have to wipe the insides as well. A 40+ gallon collection barrel on wheels sure comes in handy, but if you must use large liners to collect all of the office’s garbage because your cars trunk space won’t allow it or your keeping costs down, be sure to use thick 55+ gallon leaf bags. Some customer’s employees like to toss full cups or cans into their cans. The last thing you want is for your collection bag to break and you leave trails of coffee or coke or the carpeting. Go one better and double-bag those leaf liners. Furniture, Ledge and other surface cleaning. This is a time consuming procedure the first outing. Aside from the top surfaces, it is advised you clean the sides of all furniture. The furniture side where the garbage can is placed can be exceptionally dirty as employees oftentimes bank their garbage off of the furniture side into the garbage – and that includes beverages. Expect a mess that the customer will appreciate that you cleaned. You’ll be working with a lot of laminate, but be sure to bring some wood cleaner and polish just in case there’s wood. And don’t forget those telephones, especially the ear and mouthpiece. Kitchen / Kitchenette. Your new account has a kitchenette and you are expected to initially clean most everything in it. We’ll start from the top down, cleaning the outsides of the overhead cabinets first – a total of four doors. On the counter sits a microwave oven and a coffeemaker. If the inside of the microwave oven is caked with food debris, you may want to pre-spray the inside before tackling it. You’ll probably have to move the microwave oven and coffeemaker and clean the counter underneath and behind. The stainless steel sink can be cleansed. The wall area around the sink should be wiped. Finish-up by cleaning the cabinet doors underneath the counter. Washrooms. You want to start by pre-spraying the sink and faucet with lime/calcium cleaner and pre-soaking the inside of the toilet bowl with bowl cleaner. The ceiling vent is sure to be caked in dust, so clean that first if you didn’t during the high-dusting procedure. There are usually vanity lights above the mirror. Clean those preferably with the lights off (if enough outside light allows). Clean inside of toilet bowl with any soft material like cotton on an applicator stick. Spray outside of toilet including tank and base and thoroughly clean. Thoroughly clean the wall area, cabinet or any partitions adjacent to the toilet. Since a mop rarely fits well behind the toilet, you should hand clean this area. I recommend not using kitchen cleanser on porcelain as it will eventually sand-off the finish. Your sure to get some water on the floor use cardboard drop-cloth Floors. Depends on the tile’s materials. After the initial clean, most floors will simply need a mop washing. Ceramic tile can be left to soak in a grout cleaning solution (be sure to use your drop-cloth). A small vinyl tiled area can be left to soak in a stripper solution and then scrub with a hand-held scrub-pad applicator like a Doodlebug. Beyond that, you will have to machine scrub or strip the tile. More on that in the Floor Care section. Vacuuming. I prefer vacuums that have detachable wands. Oftentimes, a separate tank vacuum works better for wand cleaning. Because this is your initial cleaning, you will want to vacuum, with your wand, along the baseboards and corners. From there you’ll need to vacuum the upholstered furniture, particularly desk chairs, with your wand. Once your done with wand vacuuming, finish-up by vacuuming the carpeting and runners. Carpet Care. For this project, we are scheduled to strip the tiled area on the following day. Your carpeting also should be serviced on this day as well. Unless the carpeting is absolutely filthy and in need extraction cleaning, bonnet buffing is the best alternative. A carpet bonnet looks like a buffer pad and fits under your buffing machine. You soak the pad in a carpet solution in your bucket which you then wring-out well, place under the buffer, and clean the carpet as if you were shampooing the carpet. After about 200 square feet are cleaned, you re-soak the pad, wring-out, and clean another 200 square feet. Front Door and Reception Glass. Since you’ll be going in and out of the facility several times while cleaning bringing in and removing equipment, I save this procedure for last. A squeegee and applicator are optional until you have to do all of the facilities windows. Instead, you’ll be using spray glass cleaner and paper towels. I prefer brown towels or any paper towel that wasn’t whitened with bleach. Many glass cleaners have ammonia as one of their ingredients. Mixed with the bleach that’s still in the towel and you leave behind streaks on the glass. Reception glass can also imply vestibule door glass
|