|
Floor Care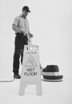
Sure would be nice if every company had ceramic flooring installed in their facility. Some do, but the majority don’t because of the material and installation costs. Instead they have vinyl tile (also known as VCT). Unfinished, this material is dull and prone to irreversible wear in high traffic areas. Finished, this floor will need constant maintenance in the form of machine buffing or burnishing and the inevitable stripping-and-refinishing. If every office was covered in carpeting and ceramics, your equipment cost could stay well under $500. But thanks to vinyl tile, your equipment cost is somewhere in between doubled and tripled. If you don’t have a floor machine -- most often called a floor buffer, but also a floor scrubber, floor polisher or swing machine (and many of you starting out probably don’t have one or are presently unable to find an affordable one) -- you’ll have to rent one. Get to know your area janitorial supply stores. They may have rentals. If not, home centers like Home Depot have floor machines for rent at the cost of around $25.00 for the day.
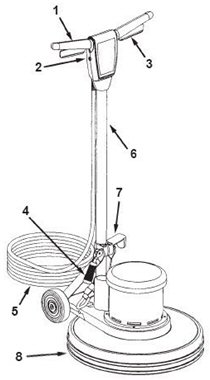
1. Operator hand grips 2. Safety Lock (optional) 3. Switch Levers (grip ON/release OFF) 4. Handle release lever 5. Power cord 6. Operator handle 7. Cord hook. 8. Pad Drive. You’ve probably seen the slap-stick usages of a floor buffer on TV where the buffer is dragging the poor user all over the place. If this is your first time behind a buffer, without instruction, expect an exasperating period of adjustment. Even my first time was exhausting, trying to corral the “beast” like I was in some rodeo. But it’s all a matter of the angle of the handle of the buffer and how you position it to your body. The average 20 inch buffer’s pad drive rotates clockwise at 175 RPM. As a result, the entire machine is inclined to pull to the right the moment you turn it on. With the weight of the handle included, the machine pulls to the right and back into you. Most beginners hold the machine far away from them at arms length. This incorrect stance is exaggerated by having the handles of the machine’s arm set at around the operators mid-section or higher. Expect then a wild and potentially dangerous ride. The solution? Both the machine’s hand grip height and where you position it to your body provides the same answer. Adjust the handles height so that the length of the right hand grip rests against your front right hip, upper pelvis. Because there is a kick to the machine, you want your hip and your body’s weight to contain the backward motion. It will now be less inclined to quickly move to the right -- but move to the right it will. Simply apply downward pressure of the left handle to “swing” the machine to the left. When you want the machine to move back to the right, simply decrease the downward pressure on the left handle. If you have a garage, practice in the very center until you get the hang of it. If you don’t have a garage, practice in the very center of the floor your schedule to scrub. If you go to a janitorial supply store, explain to them that this is your first time. Maybe they’ll let you try one out (although expect them to hard-sell you one). When stripping a floor of its old finish, strip is the word we use instead of scrub. Machine scrubbing usually implies you’re simply removing a top coat or two, or that you’re working on a floor other than Vinyl tile (VCT). You need to know the wording or the supply store salesperson may sell you the wrong solutions, pads. Likewise, the wrong advice. But, boy will they try to sell.
Five gallon pail of stripper I like to make sure I have enough with me. Of course, you can use single gallon jugs, but the empty five gallon pail comes in handy. Five gallon pail of floor finish I’ll admit, all of us janitors still call it wax, but carnauba wax hasn’t been in use since the 1970’s. The term is floor finish and you want the highest quality commercial grade. One coat of expensive high grade finish is cheaper than the three coats you’ll need of inexpensive finish. One gallon of vinegar Even though a water vacuum is used to remove all of the slurry, some alkaline depositing is still left behind. This will effect the finishes ability to bond to the floor and could yellow the finish. This is easily neutralized by a water/vinegar rinse. I use two cups per gallon. Neutralizer packets can be purchased at your supply store in lieu of vinegar. Drop-cloth You’ll find that most tiled rooms have no exit other than back onto some carpeted area . I strongly recommend that you place a drop-cloth on the carpet along the floors edge. If you don’t have a drop-cloth, I like to breakdown a cardboard box or two and place that along the floors edge. You might be able to find one in the Center’s dumpster. Shoes other than your favorites If you have a pair of old gym shoes or work boots, be sure to wear these instead. Slurry on shoes is difficult to remove. The rotating pad on the machine is sure to splash some on your shoes. The ideal number of people for stripping a floor is two. One can set-up the equipment while the other prepares the stripper solution in one bucket and the rinse solution in the other bucket. The solution preparer should always follow the instructions on the jugs of stripper and other chemicals in use. 1. If you live in a high-humidity part of the country or it’s a high-humidity time of the year, you will need control of the customer’s thermostat to keep the air conditioner on in order to draw out the humidity in the air and the humidity that you will certainly create with all the solution on the floor. If you don’t, one coat of floor finish can sit there for hours before drying. With the air conditioner on, floor finish will dry within 10 minutes. 2. Remove as much furniture and other items from the floor area before starting. Sometimes you can get the customer to remove many of their own items from the floor. Make such a request and see how much they are willing to move before they go home for the weekend. 3. Sweep or vacuum the floor of all dust and debris. Carry a razor or putty scraper with you to remove any tape or gum-like material. 4. If you have a solution tank on your swing machine, you can apply the stripper solution that way. But once applied you should stop the machine and allow the stripper to work its way into the old finish. A swing machine doesn’t do a good job of getting the solution into corners. That’s why it’s better to have the solution in a bucket and liberally applied to the floor with a large mop for even distribution. 5. Only tackle an area of 200 square feet at a time. Allow the stripper solution to sit for about five minutes. After a few minutes, you may take your utility pad and begin hand-stripping along the baseboards and corners. 6. Begin slowly stripping with the swing machine. I am comfortable with no less than three passes over the same spot that I’ve gotten down to bare floor Start by stripping along the walls and working your way inwards. Note: sometimes, a used swing machine’s pad drive will not be the original and may be of a slightly larger circumference than the machine itself. If that’s the case, do not allow it to strike the baseboards as it will leave scarring. 7. After 100 square feet has been stripped, the second operator can begin water vacuuming the slurry from the floor. While the first operator is waiting for a new 200 square foot area to soak in stripper solution, he can mop rinse the area just vacuumed with the neutralizer solution.. Be sure to mop rinse the baseboards as well. 8. After the entire floor has been thoroughly stripped, vacuumed, rinsed and dried, you may begin applying coats of finish. You don’t want your mop too wrung out, but you don’t want it dripping with finish either. With trial and error, you’ll eventually find the happy medium. Start at the farthest corner and walk backwards with your finish mop making elongated overlapping figure eights in such a manner that you never have to lift the mop until completely finishing a row or in need of more finish on your mop. I recommend no less than three coats on floors that are new or in good condition. Worn floor tile can be quite porous and . made need several more coats. Make sure the floor is completely dry before applying each coat. Use your third bucket or any bucket other than your stripper bucket. You can however insert a thick can liner in the bucket to prevent any residue infecting the finish. You then pour the finish in the liner. I do this anyway because I’m able to preserve the mop for other projects. The mop stay moist for long periods of time. Without being placed in a liner, the finish on the mop will dry and become unusable – garbage. If the floor is a high traffic area, like a lunchroom where chairs are scooted back and forth, you may want to burnish the floor after the final coat has dried thoroughly. This is meant to harden the finish to better withstand this abuse. Stripping with minimal equipment. Your first account, however, the one we previously discussed with a small kitchenette of less than 50 square feet, may not need this vast amount of equipment which you probably don’t have anyway. While you might need the swing machine for bonnet buffing the carpet, if not, then try this simple procedure. With a one mop bucket, apply stripper solution to floor. Allow it to sit while service other areas of the facility. It may eventually dry up a bit, so apply another coat. Five minutes later, use your utility applicator to scrub the floor. Mop up the slurry with the same mop. Carefully empty bucket in toilet. Depending on your customer’s need, you may not need to apply finish. If they do want a finished floor, clean bucket and rinse floor with neutralizer; empty, clean, place liner in bucket, then finish and apply the necessary coats.
|
 The parts of the Buffer that concern the operator are:
 One 20 inch buffer / swing machine I love the weight and productivity of a 20 inch buffer over that of a 17 or 15 inch. Averaging 115 pounds, it is, however, heavier to lift in and out of a vehicle and takes up considerably more trunk space. If you maintain on average less than 250 square feet per account, a 15 inch buffer will do just fine.
 One 5 pad case of hi-productivity strip pads They’re thin, only about a half an inch thick, but they’re the best.
 Three mop buckets One bucket for your stripper solution, one bucket for you rinse solution, one bucket for your finish. Even though I prefer placing solution on the floor with a mop, if your swing machine has a solution tank, you can forego one of the buckets.
 Three mop heads w/mop sticks One mop head to apply the stripper solution to the floor, one mop to apply the rinse solution, one finish mop to apply the finish. Consult with your supply store representative to explain the difference between the finish mop head and the others.
 One Utility Pad holder This is a 4 x 10 pad holder on a stick used to scrub along the baseboards, corners and hard to reach areas of the floor that the machine cannot get to. But you can also save some money and just put a small strip pad under your shoe and strip these same areas with the back and forth movement and weight of your body.
 One water vacuum for vacuuming the slurry. Slurry is the word for the grayish mixture of stripper water and old finish remaining on the floor after machine stripping.